
Michelin Raceway Road Atlanta – Raw Track Notes
14 Hours at Road Atlanta – Feb. 9th 2019 – ChampCar Endurance Series
Best Lap: 1:42.687
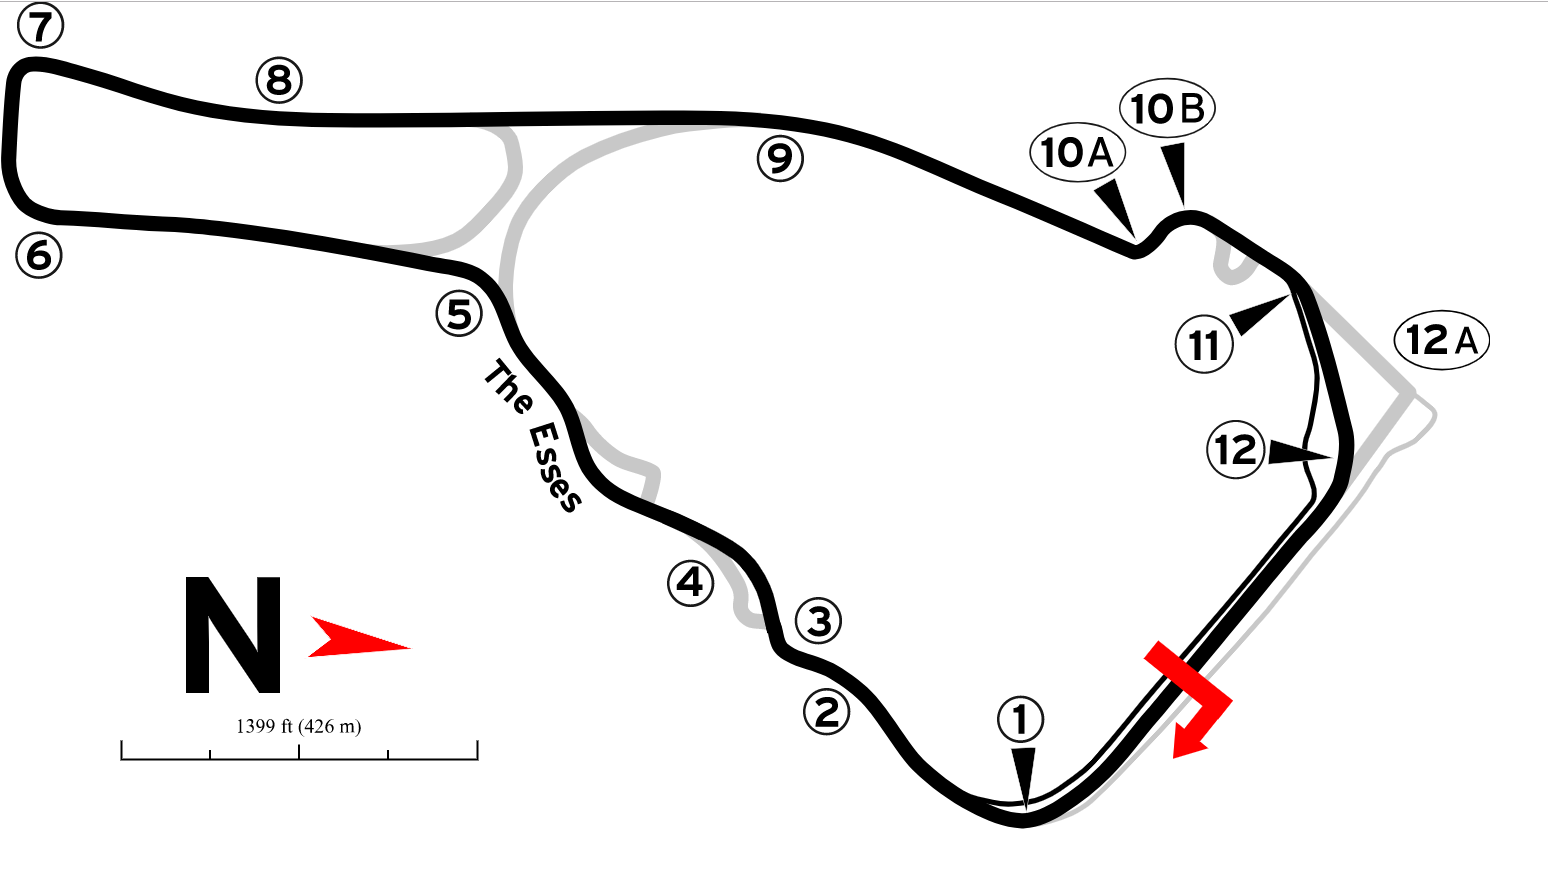
Turn 1
R – Pro-tap, Brake deep about 2 car widths to the left. Apex up hill, lots of grip, pass on the inside or out. If inside, must complete pass before 2.
J – Plenty of turn out – 5th to 4th gear. Get right for 2 and PT(FT?)
C – Braking at the end of the left side wall / 1st cone, brake pedal pressure of 80% for just long enough to downshift from 5th gear to 4th gear. Begin turn-in after 4th gear selection. Brush the inside apex curbing and go back to full throttle through rest of corner
Turn 2
R – Brake before the rumble left right jog and accelerate through 3.
J – Brake hard for 3 at rumble
C – Steer car over to right side of track crossing the end of the pit blend line before turning the car left and braking in a straight line just as you begin cresting the hill and visually see the apex on the left. 70% brake pedal pressure and start trail braking just as you see the apex curb on the right side. Use the curbing on the inside but not short-cutting over the curb. Back to full throttle at the curbing, corner is taken in 4th gear
Turn 3
R – You can take on curb, DO NOT re-enter track through the outside rumble. (Bent rim) – A good run CAN allow passing into 4.
Turn 4
R – Shift to 5th and a very light lift down the hill.
J – Throttle with breath
C- Full throttle 4th gear hugging the left apex curbing. Tracking out no more than mid track before getting all the way over to the left curbing that starts the Esses.
Esses – Begin turn-in at the start of the left side curbing. Slight lift of throttle and back to full power through the right and left corners at the bottom of the hill. All done in 4th gear.
Last Right-hand Ess – Lift off throttle and try to steer car around the back side of the corner and brake application is smooth at first…60% pressure to start.
– Once car settles, increase pressure to 80% for short time before quick trail brake, turn-in, and back to full throttle for turn 5 uphill.
Turn 5
R – 4th Gear – Brake early, take it faster than you think. No good passing zone here.
J – Hard Brake – Down to 3 if passing
C – Brush the left side apex curb and let car’s momentum track out to outside curbs. Can use outside curbs but I chose to usually just touch the curb for wear and tear reasons.
Turn 6
R – Pro-tap 4th gear – fast corner – Lots of inside passing.
J – Brake at 3
C – Start 90% braking at the 3 marker drivers left along the edge of the track. eventually trail-braking down to the right apex curb and back to full throttle at curb letting car track out to left side.
Turn 7
R – 3 Gear and a perfect late apex is needed. – Inside passing can be done, but better to get good run out of corner.
J – Brake at out and 4-3 gear
C – Get car straight at outside edge of track and start a 80% brake careful not to lock the inside front right tire. After braking starts, downshift from 4th to 3rd gear and start turn-in when gear change is done. Feed in throttle to full as you touch the right side apex curb and track out to far left side just brushing the curbing.
Turn 8/9
C – are the straightaway. Goal is to make a straight line between them and shifting efficiently from 3rd to 5th gear.
Turn 10a
R – Pro-tap – Stare down turn it, could brake at 150 full threshold with pax rear caliper seized. 3rd gear. Shift into 4th after jog at top of hill. And 5th down hill. Flat through 12. CAREFULL Passing under bridge on right.
J – 5-4-3 gear, 3 brake marker, 4-3 gear at top of hill, 4-5 before 12 turn in.
C – Begin 90% brake pressure at the 2 marker with car all the way driver’s right. Can brake threshold at the 1 marker and make it if at qualifying pace. Downshift from 5th to 3rd and after final gear selection turn in left and use all of the inside apex curbing.
Turn 10b – Quick transition to the right apex curbing. I only brushed the curb to avoid any power down issues over rumbles. Let car track out to left side and avoided using left side curbs for power down advantage.
Turn 11 – Used the red colored section on the bridge overhead for a reference and shifted to 4th gear between 10b and 11. Full throttle over hill and down the hill before going to a maintenance throttle near the top of 4th gear and getting the car right alongside the right apex curbing. Shifted to 5th gear as I was unwinding the wheel from apex to track out curbing.
Turn 12
R – Time your run for passing at start finish. The miata has 2 car widths to work at full throttle.
Chris Additional Notes:
Passing
Turn 1 was easy with a proper run. If not quite there, backing off and passing on the right while crossing the blend line in turn 2. Outside of turn 2 worked also depending how driver in front was driving. Did pass into turn 3 a few times if the opportunity presented itself and you knew you could get all the way alongside before other driver even thought of turning-in. I passed alot of car on the outside around turn 4, especially if they were slow or quick car had bad exit off turn 3. Stayed in line mostly through the esses unless someone gave me the position. Usually set cars up and made my move in turn 5 up hill with a good run on them. Turn 6 was a good spot for passing most cars but made sure I had it because the straightaway was coming. Only passed into turn 7 a couple times because I didn’t trust car ahead not to turn-in on me. Turn 10a was easy pickins for passing but if any doubt I would either wait to do it climbing the hill out of 10b and over the hill into the start of 11.
RPM’s: After getting the call to shift at 6500 I did that for all my stints and only didn’t when at the bottom of the esses, turn 6, and exiting turn 11.
There were much better lap times than we turned available throughout my stints but I mainly focused on being efficient through traffic and smooth on the car. Never tried for an ultimate lap. Anywhere above that I used 90% or 80% in braking could have qualified for threshold braking if a stunner lap was needed.